
Download the pdf to see what software licensing options are available.
Download the pdf to see what support plans are available for your IronCAD, LLC application.
Go to the below link and request a license file.
Updating Your License – IronCAD Tech Blog – IronCAD Community
It should be in your Startup program group or logout and back in should restart it.
If all else fails, run C:\Program Files\Common Files\IRONCAD Shared\LiveUpdate\IronCADUpdate.exe
It may be helpful if you save a shortcut to this executable file.
Go to http://services.ironcad.com/activation/ to get your license file (.pkg file).
Save the PKG file (in case you haven’t received from us) to the server.
On your license server: Start the IronCAD Network License Dongle Manager (right-click the icon and select Run as Administrator)
Stop the Service.
Import the license file.
Start the Service (if it doesn’t start automatically).
Install any new software or add-ons you have purchased.
Go to C:\Program Files\IronCAD\20XX\bin
Edit the file e4ncli.ini
Enter your server’s IP address in the HOSTADDR entry.
In some cases you may need to restart your computer in order to reconnect to the server.
On the IronCAD computer go to the IronCAD program group and select Net License Configure. This will load a text file that has the servers address.
IronCAD Sentinel RMS Server update guide.
- Run the Hardware ID Tool on the server.
- Get the two Codes, one for Disk ID, then one for Ethernet (0x4 and 0x10)
- Send those codes to support@ironcad.com along with your license serial number.
- We will return a license file: Save the file to a folder on your hard disk on the server. Launch the IronCAD License Manager Admin tool. Right click on your server and choose ‘Add Feature/From File/To Server and it’s File’, and then browse to and select this license file saved on your disk.
To transfer a license to a new PC (you must be online during this process):
Run the License Management Tool from the Start>All Programs>IronCAD>IronCAD 20XX
Remove Licenses, answer Yes to both prompts.
Then, on the new PC, you can use the License Management Tool, “Activate a Software License” to enter your serial number and codeword to activate the license.
To make this more clear:
Remove the license from Computer A.
Click yes to send notification back to IronCAD.
Save the exported file.
This is the most important thing: You cannot import the exported file, you just activate on computer B using the serial number and codeword. Import is for when you receive a PKG file from support.
Options: Export your Options from the Options dialog (Tools – Options or Main Menu – Options), then Load them in the new PC:
Ribbon/Toolbar: Save your config and load in another PC:
NOTE: if you migrate your Ribbon/toolbar from one version to another you might overwrite what is new in the UI in the new version so you might have to add them back in manually.
Keyboard shortcuts from one version to the next: Copy the XML file(s) from C:\Users\%USERNAME%\AppData\Local\IronCAD\IRONCAD\23.0\Customization to C:\Users\%USERNAME%\AppData\Local\IronCAD\IRONCAD\24.0\Customization
- Edit the XML file.
- Search and replace IRONCAD23 with IRONCAD24 (should be in two places).
- Save the XML and start IronCAD.
Catalogs: Copy any Catalog .icc files you’ve customized from one PC to the next. The default location for Catalogs is C:\Program Files\IronCAD\2022\AppData\en-us\Catalogs but they could be saved anywhere.
Sheet Metal: Copy StockTable and ToolTable files from one PC to another if you have customized them, the default location for the sheet metal tables is C:\Users\%USERNAME%\AppData\Local\IronCAD\IRONCAD\24.0\en-us\SheetMetal
Templates: Copy your custom template files from one PC to another. The default location for templates is C:\Users\%USERNAME%\AppData\Roaming\IronCAD\IRONCAD\24.0\en-us\Template
C:\Users\%USERNAME%\AppData\Roaming\IronCAD
C:\Users\%USERNAME%\AppData\Local\IronCAD
C:\Users\%USERNAME%\AppData\Local\CAXA
C:\Users\%USERNAME%\AppData\Roaming\CAXA
If you are a user that likes to fully customize their IronCAD experience with Shortcuts, Ribbon Bars, Etc, and don’t like having to set up the shortcuts between each version, there are ways to bring your settings with you to the new version. In the example below, we will be transferring from 2018 to 2019, so we will copy the XML files located at:
C:\Users\%USERNAME%\AppData\Local\IronCAD\IRONCAD\20.0\Customization
to the new location at:
C:\Users\%USERNAME%\AppData\Local\IronCAD\IRONCAD\21.0\Customization

After doing so, you will need to edit the all the files using notepad and replace the text that says:
IRONCAD20 (or your current version)
To: IRONCAD21 (or whatever the newest version is)
(Use Ctrl + F to find the Text within the File)
Save the XML file Repeat this for all the files you moved. Your settings should be there for you in the new version of IronCAD.
Note: New commands added in the new version of the product will not be available in your older files. You can perform a document compare using standard text compare software to locate the new commands added to add them to your older files. This can give you the latest XML’s with your customization’s!
The “Lock ID #” is the number assigned to your computer by IronCAD for licensing issues. To retreive this number, there are two (2) ways.
1.) Go to START>All Programs> IronCAD> IronCAD 20XX> License Management Tool> Show Current Activated Licenses> Next… the Lock ID number will show at the top of the resulting dialog box. Simply Copy and Paste and email to support@ironcad.com to receive your license code.
2.) From within any IronCAD program select the MAIN ICON (top left)> HELP> License Manager> Show Current Activated Licenses> Next… the Lock ID number will show at the top of the resulting dialog box.
The online user guide can be accessed via this link:
http://ironcad.it/learnICM/en/
Below are the items included in the free version of IronCAD Mechanical add-on:
- BossThreads
- Fasteners
- Bearings
- Holes
- Orings
- Seegers
- Steels
No, it’s unlimited, but the more tasks that have been saved to the IronCAD “memory” the slower the performance of your computer becomes. IronCAD by default sets the undo attempts to 25. Once the working file is saved, the undo number resets. If you wish to increase that number then go to OPTIONS> General> “Number of undo steps” >OK.
From your IRONCAD program you have to save out a .icsw file using the “Save for Mobile” command on the Add-ins ribbon bar.
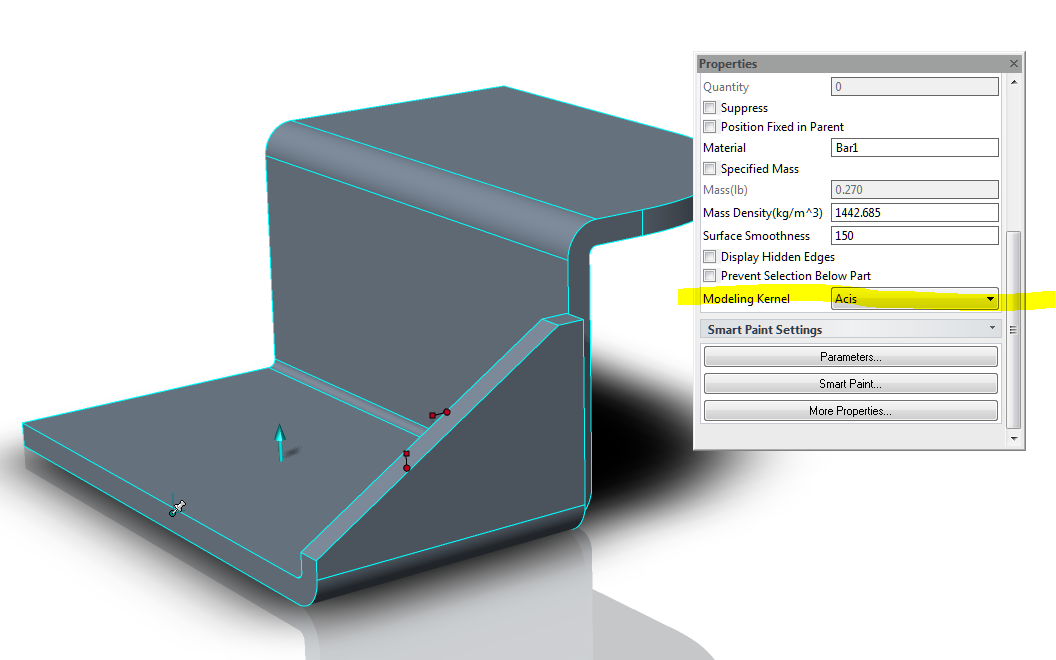
Most of the time, barring any physical modeling mistakes made by user, make sure you change the sheet metal parts modeling kernel to ACIS. ACIS handles sheet metal better.
Sometimes ex-AutoCAD users like to use the Command Line to enter tasks and commands. So in DRAFT simply right click in the gray area just about the “Command” status and make sure to check on the “Command Line” option. Then a new command space will pop up on the below of the UI.
If you think your IronCAD is suffering from registry issues and are confident in your skills to play with the registry then this might help.
IronCAD Cleanup:
- Delete these folders:
- C:\Program Files\IronCAD\20XX
- C:\Users\%USERNAME%\AppData\Roaming\IronCAD
- C:\Users\%USERNAME%\AppData\Local\IronCAD
- C:\Users\%USERNAME%\AppData\Local\CAXA
- C:\Users\%USERNAME%\AppData\Roaming\CAXA
- Run regedit.exe and delete:
- HKEY_CURRENT_USER\Software\IronCAD
- HKEY_LOCAL_MACHINE\SOFTWARE\IronCAD
- Go to the folder %TEMP% and empty it as much as Windows will allow.
- Reinstall IronCAD.